How to create a Keyswitch on a NX / Reliance alarm system
Table of Contents
What is an Alarm Keyswitch?
A zone attached to a momentary keyswitch will arm/disarm the panel if the zone is
momentarily shorted from a sealed condition.
How To Setup and Program A Keyswitch
In this guide, we will go through creating a key switch on a NX or a Hills Reliance alarm panel to add remote arming functionality for a control room or mobile app using a Permaconn or any other GPRS unit that has relay outputs such as a T4000, Direct Wireless etc.
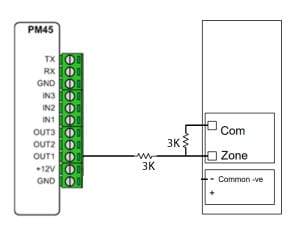
Important: A free zone/input is required for a Key Switch- Remember you can zone double on most of these panels if required.
First, you will want to connect the GPRS unit to the key switch zone. This is done by the following:
Single End Of Line Resistor Wiring

Double End Of Line Resistor Wiring
Once you have the zone wired in you need to program the system to arm / disarm using this zone.
Programming Zone 1 for keyswitch
- *8
- 9713 (Installer Code)
- 0# (Panel Location)
- 18# (Zone 1-8 Configuration Location)
- 30* (Changing Zone 1 to type 30-Keyswitch)
- #
- Exit
- Exit
Programming Zone 2 for keyswitch
- *8
- 9713 (Installer Code)
- 0# (Panel Location)
- 18# (Zone 1-8 Configuration Location)
- * 30 * (Changing Zone 2 to type 30-Keyswitch)
- #
- Exit
- Exit
Programming Zone 3 for keyswitch
- *8
- 9713 (Installer Code)
- 0# (Panel Location)
- 18# (Zone 1-8 Configuration Location)
- (2 Stars) * * 30 * (Changing Zone 3 to type 30-Keyswitch)
- #
- Exit
- Exit
Programming Zone 4 for keyswitch
- *8
- 9713 (Installer Code)
- 0# (Panel Location)
- 18# (Zone 1-8 Configuration Location)
- (3 Stars) * * * 30 * (Changing Zone 4 to type 30-Keyswitch)
- #
- Exit
- Exit
Programming Zone 5 for keyswitch
- *8
- 9713 (Installer Code)
- 0# (Panel Location)
- 18# (Zone 1-8 Configuration Location)
- (4 Stars) * * * * 30 * (Changing Zone 5 to type 30-Keyswitch)
- #
- Exit
- Exit
Programming Zone 6 for keyswitch
- *8
- 9713 (Installer Code)
- 0# (Panel Location)
- 18# (Zone 1-8 Configuration Location)
- (5 Stars) * * * * * 30 * (Changing Zone 6 to type 30-Keyswitch)
- #
- Exit
- Exit
Programming Zone 7 for keyswitch
- *8
- 9713 (Installer Code)
- 0# (Panel Location)
- 18# (Zone 1-8 Configuration Location)
- (6 Stars) * * * * * * 30 * (Changing Zone 7 to type 30-Keyswitch)
- #
- Exit
- Exit
Programming Zone 8 for keyswitch
- *8
- 9713 (Installer Code)
- 0# (Panel Location)
- 18# (Zone 1-8 Configuration Location)
- (7 Stars) * * * * * * * 30 * (Changing Zone 8 to type 30-Keyswitch)
- #
- Exit
- Exit
Important: Open and Close reporting is required for mobile applications to display correct alarm state. EG. Armed / Disarmed
Feature 9: Segment 1: option 3: must be enabled: – OPENING / CLOSING COMMUNICATOR CODE.
To enable OPENING / CLOSING COMMUNICATOR CODE:
- *8
- 9713
- 0#
- 9#
- If “3” is not displayed on the keypad press 3* – If “3″ is displayed goto next step
- #
- Exit
- Exit
Feature 16: Segment 3: option 1 must be enabled: open / closed reporting.
- *8
- 9713
- 0#
- 16#
- * *
- If “1” is not displayed on the keypad press 1* – If 1 is displayed goto next step
- #
- Exit
- Exit
You can now test your keyswitch.